# deepseek-cursor-proxy
Compatibility proxy connecting Cursor to DeepSeek thinking models (`deepseek-v4-pro` and `deepseek-v4-flash`).
## What It Does
- ✅ Caches DeepSeek `reasoning_content` from regular and streamed responses, then restores it on later tool-call turns when Cursor omits it. See [DeepSeek docs](https://api-docs.deepseek.com/guides/thinking_mode#tool-calls) for more details.
- ✅ Mirrors streamed `reasoning_content` into Cursor-visible `...` text so that thinking tokens are shown in Cursor's UI. For BYOK/proxy mode, Cursor renders this as normal text, not as a native collapsible thinking block.
- ✅ Starts an ngrok tunnel so Cursor can reach the local proxy.
- ✅ Provides other compatibility fixes to make DeepSeek models run well in Cursor.
## Why This Exists
This repository fixes the following Cursor + DeepSeek tool-call error with thinking mode enabled:
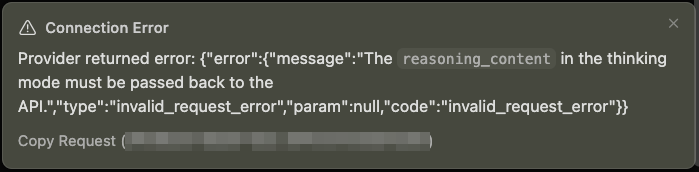
```txt
⚠️ Connection Error
Provider returned error:
{
"error": {
"message": "The reasoning_content in the thinking mode must be passed back to the API.",
"type": "invalid_request_error",
"param": null,
"code": "invalid_request_error"
}
}
```
## Usage
### Step 1: Set Up ngrok
Create an ngrok account, visit ngrok's Dashboard: https://dashboard.ngrok.com
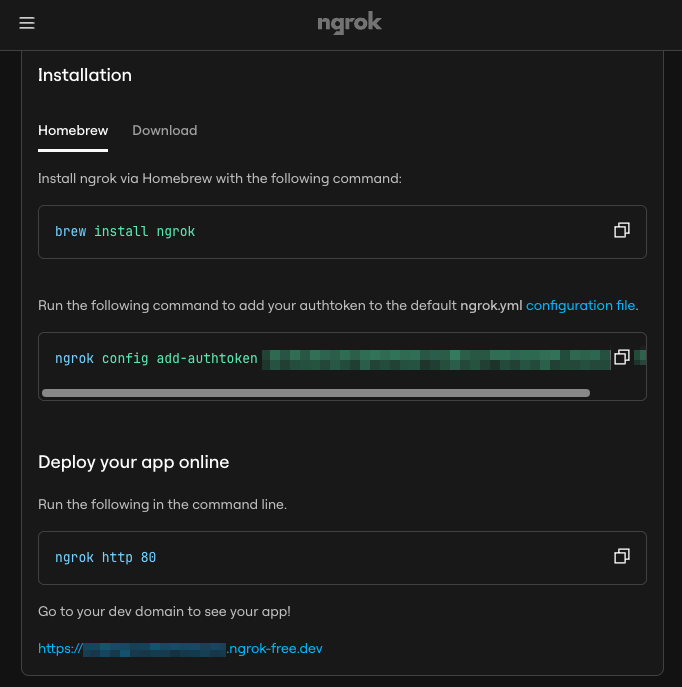
Then, install and authenticate ngrok once:
```bash
brew install ngrok
ngrok config add-authtoken
```
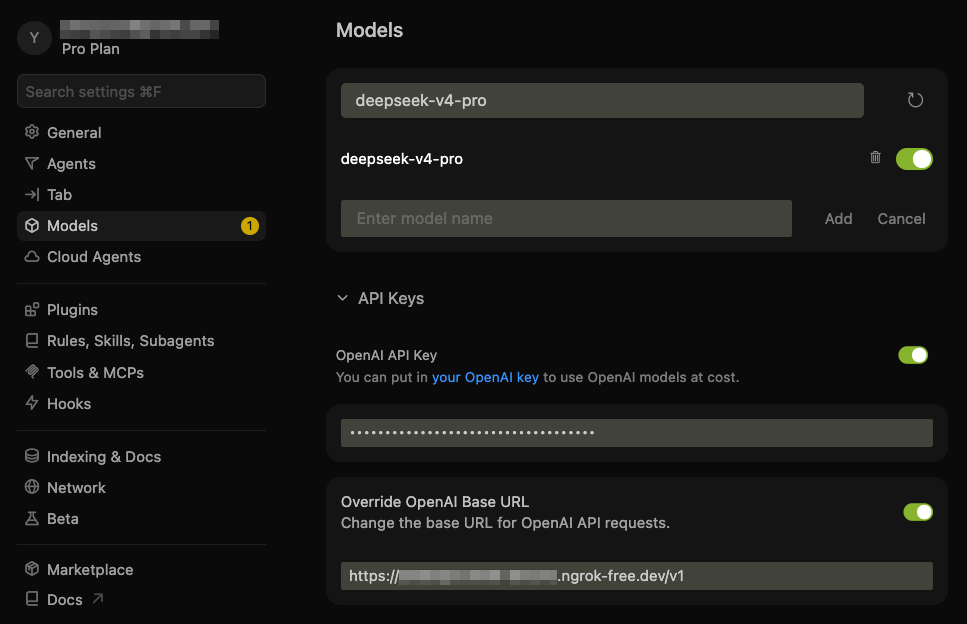
### Step 2: Add Cursor Custom Model
In Cursor, add the DeepSeek custom model and point it at this proxy:
- Model: `deepseek-v4-pro`
- API Key: your DeepSeek API key
- Base URL: your ngrok HTTPS URL with the `/v1` API version path
For example, if ngrok dashboard shows `https://example.ngrok-free.app`, use:
```text
https://example.ngrok-free.app/v1
```
Note: you can toggle the custom API on and off with:
- macOS: `Cmd+Shift+0`
- Windows/Linux: `Ctrl+Shift+0`
### Step 3: Start the Proxy Server
Install and run the proxy:
```bash
# Or, use your favourite Python package manager
conda create -n dcp python=3.10 -y
conda activate dcp
# Install
pip install -e .
# Run in normal mode
deepseek-cursor-proxy
```
The proxy creates `~/.deepseek-cursor-proxy/config.yaml` on first run.
This will also print the ngrok public URL. If it differs from the one in Cursor, update it in Cursor's Base URL field.
Normal mode prints startup info, the ngrok URL, and safe request summaries. It does not print prompts, code, API keys, or request bodies.
For more request lifecycle metadata, use verbose mode:
```bash
deepseek-cursor-proxy --verbose
```
Verbose mode adds client/path/upstream metadata and full payload logs. It may print prompts and code to the terminal, so keep it off for normal use.
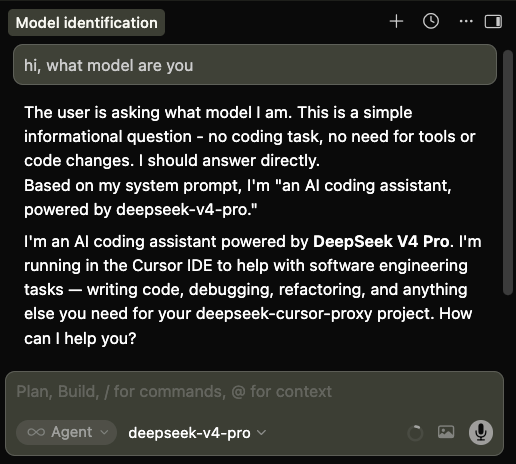
### Step 4: Chat with DeepSeek in Cursor
Select `deepseek-v4-pro` in Cursor and use chat or agent mode as usual.
## Debugging and Development
Run without ngrok for local curl testing:
```bash
PROXY_NGROK=false deepseek-cursor-proxy --port 9000 --verbose
```
Use another config file:
```bash
deepseek-cursor-proxy --config ./dev.config.yaml
```
Run tests:
```bash
PYTHONPATH=src python -m unittest discover -s tests
```